I’ve been surfing the net the other day trying to find some airbrush compressors and found out the availability is very good so anyone can buy airbrush compressor online with no hassle. Of course for a good one you will have to pay nice bunch of money. But at the same time I found really interesting solution for those of you that prefer some DIY over shopping. Here it is: homemade airbrush compressor.
If you build it yourself it will help you to save some money. The whole “know-how” comes from a Russian website so I will become translator for a while. The main issue for all the airbrush artists is the right air pressure at the input of the airbrush gun. One of my issues at the start was money so I was looking for a simple and at the same time cheap solution. As you probably already figured out airbrush won’t work without compressor. I knew that there is one kind of compressor that most of us can get for free or for a very little money. All I needed was just to find the way how to use it. What kind of compressor am I talking about? :) …I’ll tell you later.
For now you can follow these steps:
- Search
- Surgery
- Preparation
- Utilization
- Maintenance
Search
There are many places like basements, scrap yards, trash bins – places where people put the stuff they are not going to use anymore. All you have to do is to look for a big, usually white box called FRIDGE :).
Yes, you’re right. Every fridge has a compressor, even the broken one. If you go to search for a big white box don’t forget to take some tools; usually couple of screw drivers with different heads, some combined pliers and spanner set as the size of dies in fridge can vary. If you’ve found your patient you can start the second step.
Surgery
You don’t have to be doctors to do that but you have to be careful and avoid any problems caused by carelessness. First what you have to do is to cut off the copper pipes from fridge radiator.
DO NOT SAW IT!!! The sawdust would get into the pipes and your compressor will become “sick” and die after a very short time.
Use only pliers and try to keep the pipes as long as possible as after all every cm matters. The pliers will squeeze up the pipes at their ends and this will also prevent oil leak during the transport. Some types of compressors used to have a metal plate with numbers attached to pipes – do not take it off.
At this point it is good to check the oil inside our trophy. Pour some oil on a piece of white paper. If you see any silver particles in the oil you can stop the whole operation and memorialize the poor guy with a minute of silence. If the oil is clean you’re good to go.
Very important thing – the compressor is not the only one big piece of metal junk you’re going need.
We will need one more part – start relay. It is small black or sometimes white caddy separately mounted near compressor. It has some cables connected to it.
I would recommend making a drawing of how it was mounted and connected before you take it off.
Some types of compressors have their relay directly on them, so you won’t need to demount it. But you surely will have to cut of two input cables.
Once you have demounted everything don’t forget to take all the pieces with you.
Preparation
At this point you have to arrive home. Tired, dirty from oil and perhaps with some scratches but it does not matter because you have the trophy :).
Now first of all you have to check if your compressor is still alive. We have to do the launch check.
DO NOT turn it on now – READ FIRST!
Put the relay back on the compressor according to your drawing you’ve made before. Relay has to be oriented exactly the same way as it was on the fridge as the relay depends on earth gravitation. Otherwise it may cost you the relay or even the engine inside the compressor might burn out.
Now connect the temporary cradle to the input of the relay and don’t forget to use electrical tape. I don’t think you want to die. This is how the draft version looks like:
Next use the pliers and release the squeezed pipes and leave them opened. When everything is ready connect the plug into the mains socket. The launch itself could be very loud depending on the power of the unit but it understandable so don’t get scared. If you hear the engine and it is pretty quiet then everything should be fine. The pipes will suck and blow the air – you have to find out which one does what. You don’t have to leave it on for a very long time as the main thing right now is to make sure that it is alive. If the engine didn’t start or if it started but then after short time went off the things aren’t looking good. If you have some experience and electric multi-meter you can check what exactly is wrong and more skilled of you could even try to fix it. Otherwise forget about the whole thing and start looking for another one. If it’s working skip the checking process.
Checking: Take off the relay and check the coils of engine for short circuit. They should have a small resistance between them even in different combinations. If at least one of the coils doesn’t show anything it means that we hold a dead body of the compressor. If every coil has some resistance you have to check the relay and clean it. Carefully open the relay box and clean the contacts with fine sand paper. DO NOT BEND OR BREAK THEM!!! And do not grind them too much. Now close it back and try the whole launch again. If it didn’t start or if it keeps going off by itself than I’m very sorry about that (if you are not using original relay from another fridge then switching off can be caused by engine being too powerful for the relay and you have to look for another relay – that’s why you meant to keep the metal plate on the pipes, it will help you to find the specific relay for your engine).
I hope that you didn’t get into any trouble and everything is working. Now we can start to build our machine. Everyone has his own equipment, facilities and resources but I’m going to point out what you’re going to need.
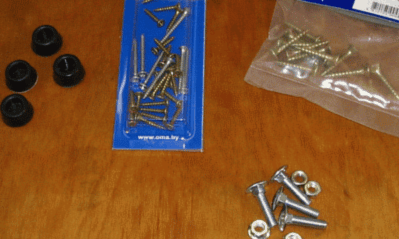
Visit your closest car parts shop and buy this:
- 1L of motor oil 10w40 or other semi-synthetic motor oil. If you can get a 500ml package it is going to be enough.
- Oil and fuel resistant durable armed rubber hose about 1m long and 4mm of inside diameter. It won’t hurt to take a small piece of copper pipe to try it on in the shop just to be sure.
- 6 metal hose clamps for the rubber hose with diameter just a little bit bigger than the hose.
- PVC hose for windshield screen washer. It’s half transparent hose (some are even armed but we don’t need those). Choose your own length as your comfort will depend on it. I would recommend at least 2m.
- Two filters for fuel filtering – one for petrol (gasoline) and one for diesel fuel. Visually they are different as petrol has a paper harmonica inside while the diesel one has a synthetic net.
- Thick silicon (oil and fuel resistant) sealant. Thin, black silicon sealant is not very good for the job.
Than go to electrical shop and buy:
- Power cable with double isolation and at least 1.5m long.
- On/Off switch closed type
- Lag screws size 3.5×16 or 3×16
That’s all you will need at the moment:
Next we have to change the oil. Why? Read next article on this topic.
At this stage there is a technical question: Which type of compressor do you have in your hands? By shape there are two types – cylindrical and casserole type. First one is practically extinct as production of this type stopped at the end of 70s, but if you manage to find one and it’s alive you are very lucky. The pressure on its output is higher than on casserole type. So how do we change the oil? The cylindrical one has a big screw-bolt. Unscrew it and drain out the oil into some bowl so you can later measure the volume of the oil. Depending on the type of cylinder it might be something between 300ml and 500ml. Then screw the bolt back and don’t forget to seal it using silicon sealant.
With the casserole type it is a bit more complicated as there is 3 pipes sticking out of it. Two are pumping the air in and out, the third one is for oil. Again do not saw the pipe!!! And remember after you have drained the oil out do not turn the compressor on, you have to pour the new oil in first.
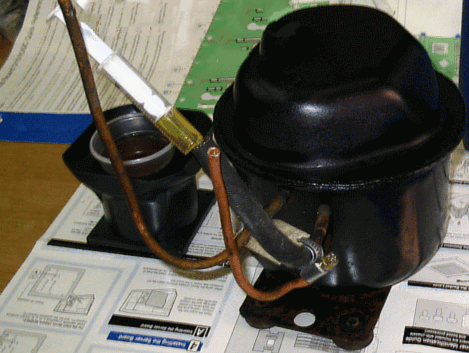
On the second picture is the same compressor however a bit restored ![]() and with new oil already in. As you can see I’ve used rubber hose on the oil pipe outlet.
and with new oil already in. As you can see I’ve used rubber hose on the oil pipe outlet.
For this type of compressor you will need about 250 – 350 ml of oil. After that screw the lag screw into rubber hose and put some rubber seal under the screw.
I know that there are going to be some people that are going to feed the oil to compressor during the run. I do not recommend to do that.
Oil has to be changed before you turn on the compressor as running it without oil is the same as to kill it right away.
Second of all if you pour to much oil (in pistons mechanics) you risk something called hydraulic hit.
It happens when into space above the piston comes more fluid that it can compress (fluids are almost not compressible). As result we destroy the whole piston system. I hope you get the point.
Let’s continue. On the next image you can see how it is going to be set.
If you connect everything according to this drawing you’re going to get fully working airbrush compressor. To make it more practical you have to fix everything on some kind of stand or table that will minimize the possibility of breaking it. I have used a piece of timber board. The size of the board depends on the size of the receiver you are going to use. Receiver is a big white bottle you have seen on the photos. Why do we need it?
- It smoothen the pulsation of air coming from compressor so at the output you will get a smooth fluent flow of air without pulsation.
- It also catches the drops of oil and exhaust from compressor.
For this type of compressor we will need receiver with capacity of 1 – 2l. Practically you can use any hermetically firmed reservoir. I would not recommend using plastic or glass bottles as under the pressure they can blow off and cause injury. I’ve seen some people using an old empty fire extinguisher as the receiver but it requires more skills and tools to accomplish something like that. In our case we use old water reservoir from a car. It is made of polyethylene that is more firm that the plastic bottle and it’s hard to destroy even with sharp knife. Even if it blows off it does not make a massive explosion as for example glass does.
How to make a receiver? When you have your bottle ready take the lid off and drill two holes into it. If you can get 2 copper pipes something like 15cm each (if the pipes on the compressor are long enough you can cut those off but leave at least 10cm on the compressor). These pipes are supposed to fit into holes on the lid you’ve drilled before. After fitting put some epoxy resin on the inside of the lid but not too much so you can screw the lid back on the bottle. Do that only when the epoxy is dry. Don’t forget to use some silicon sealant between the bottle and the lid. When you will be fitting the pipes make sure they are very close and their ends are exactly as on the drawing (output pipe is shorter and the end is positioned higher).
After you have all the parts ready you can see what size of board you will need for the chassis. Don’t forget that compressor needs some cooling so leave some more space around it. I used timber board with size of 30cmx40cm. The finish of the panel is up to your own taste. I’ve also used rubber pads to prevent the stand from moving during the work process and it absorbs the noise as well. I hope you didn’t forget all the screws at the crime scene ![]() as now you’ll need them to mount your compressor to the timber board.
as now you’ll need them to mount your compressor to the timber board.
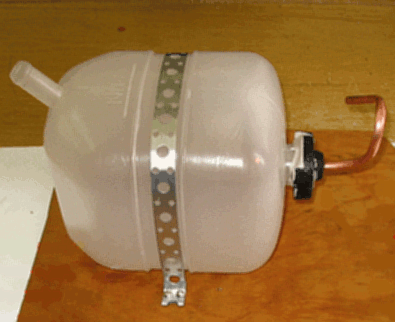
I would recommend mounting the receiver exactly as you see below:
Of course as belt you can use anything, for example rubber, leather but it has to be firm.
And here is an example of how to fit the relay, switch and cable:
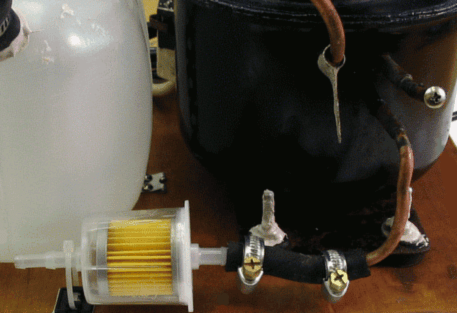
When you finish with the electrical part we’re going to fit the pneumatic system. At the inlet of the compressor we connect petrol (gasoline) fuel filter using short rubber hose and 2 metal clamps. Someone might say this is useless but I say go for it anyway, it’s cheap and you won’t have to worry about dust getting into your compressor. Very important thing is not to get any oil into that filter as it won’t do any filtering anymore.
Next, with a piece of rubber hose and other two clamps connect output pipe of the compressor with input of receiver. On the output of receiver put another piece of hose and fix it with a clamp and other end of it will hold diesel fuel filter fixed with last clamp we have left. Be very careful when fitting the receiver and make sure you don’t break the lid.
Diesel filter is almost last element of our unit. Now fit the PVC hose. Usually the diameter of that hose is smaller than output of the filter so it is very difficult to put it on. If you have white spirit put the end of the hose into it but not deep (5mm is enough). After that it won’t be a problem to fit that hose. Fit the hose to timber board and it’s done. Congratulations if it works well, but I would recommend to start using it only after couple of days after silicon sealant is completely dry.
Utilization
Nothing special about that.
The only thing to remember – do not let your compressor to overheat.
Usually the temperature rises to 40-45°C in 25-30 minutes of continuous work. After that time you should let the compressor take a break. Otherwise you will have to regulate the air pressure.
Some types of compressor can produce more air than we need for airbrushing. In that case we will have over-pressure in the hoses, filters and receiver and the compressor itself will be overloaded what can lead to fast overheating. If this is the case, you’ll have to get a reducer. The reducer has to be placed on the input of the compressor not output, as that would also cause overloading. By placing the reducer on the input we reduce the capacity of the air coming in – that regulates the pressure. So what can we use as the reducer? Any calibration pipe placed on the input of petrol filter will work as reducer. You can make one yourself or visit pet shop and buy an aquarium valve reducer. It’s cheap and very useful as you can regulate the pressure during the work.
Maintenance
This process is not complicated but to do so you will have to take off some parts. Of course you don’t have to maintain at all but it will definitely extent your compressor life.
The steps you have to follow:
- Changing the oil
- Changing the filters
- Cleaning of the receiver
Oil, even the best one, is losing its properties and goes dirty with the time. So regardless of worked hours I recommend to change oil once a year.
When you’re going to do that, take off the compressor all the hoses, unscrew the screw from the filling pipe, drain the oil out and pour new one in as you did during the build. Remember not to turn it on when it’s empty. While you have all of the hoses off exchange also filters and drain the oil if any from receiver. Do not pour that oil back into compressor.
Fit everything back and that’s it.
The End!
PS: If you like this article please share or if you have any advice please leave a comment.
Source: http://www.rumodelism.com
Written by Klev.


