I have posted article called “How to Make a Stencil in CoreDRAW” before. Out of this article I got an e-mail from one of my readers last Sunday.
Ronnie: “Dear Sir, I am new to CorelDRAW X5. I bought the program to help me with airbrush stenciling. The question is how you make a layered stencil in CorelDRAW?. I know it can be done, I just don’t know how. Here’s an example of what i am trying to do. I have a full colored picture of a pin-up model I want to airbrush. I want to separate the stencil in to several different parts to ensure I get the highlights right and so forth, so a stencil with all my blacks, then reds, dark skin tones light skin tones and highlights. Your assistance would be greatly appreciated! Thank you!”
That’s a good question and I want to know that myself. I always want to help my audience and just out of my curiosity I decided to find the solution as it could be a huge help not only for me but for everyone interested in this topic (I believe that’s the case for many of you!).
I have not found any Multi layered stencils for CorelDRAW but I found tutorials for Photoshop. As Corel PHOTO-PAINT is very similar I’m going to apply rules for Photoshop into Corel PHOTO-PAINT and then just add it into CorelDRAW.
Here’s what I’ve found:
How to Create a Multilayer Stencil in Photoshop — powered by eHow
So, How to Make Stencil With More Layers in CorelDRAW?
I’ve been working on the answer since then and I think I’ve found the solution. Maybe there are people who actually know how to do that and I’ll be thankful if they leave a comment or send me a message so I can try something else, but here is the way I found this week and it’s a pretty simple one.
First of all you’ll need CorelDRAW Suite X5. I use Corel PHOTO-PAINT X5 for one part and CorelDRAW X5 for the second part. So, you don’t have to bother with buying another software or look for some free editors if you have already bought CorelDRAW. And let’s be honest – Corel Suit is one of the best solutions for anyone who wants quality stencils.
1. Start with Corel PHOTO-PAINT X5
This program is bitmap editor similar to Adobe Photoshop. If you’re going to use Photoshop and you have it on your PC then don’t bother with this step (just follow the video above) and skip to step 2. I found it a bit frustrating that even if you are good in Photoshop however never worked in PHOTO-PAINT you’ll be lost (couple of hours for sure) and you’ll be going mad!
If you’re going to look for layers you won’t find any as here they’re called “Objects”. The term Layers is then used in CorelDRAW. First I was trying to follow the Photoshop video and apply it to PHOTO-PAINT but later I found out an easier way where you won’t need layers, objects…
The tool that is very important here is “Threshold“. In Photoshop you can find it under “Image > Adjustment > Threshold” but in Photo-Paint you won’t find it in Adjustment menu. It’s under “Image > Transform > Threshold“.
I do not recommend to create Objects in Photo-Paint. Just make every layer in separate image file using different level of the Threshold setting to for every layer of stencil. You can make it in colors, but for now we’re going to work just in Black and white and give it a gray tone. This tool will work mostly for highlights of the image. If you want to make separate stencils for each color you will have to use such Tools as “Mask > Color Mask” and once you’ve selected the color use tool “Object > Create > Object Cut Selection“. This has to be repeated for every color (In my case I got 9 layers). But if I include color separation process here, my tutorial will be too long. Don’t worry I have already started writing it and I’m hoping to publish it very soon.
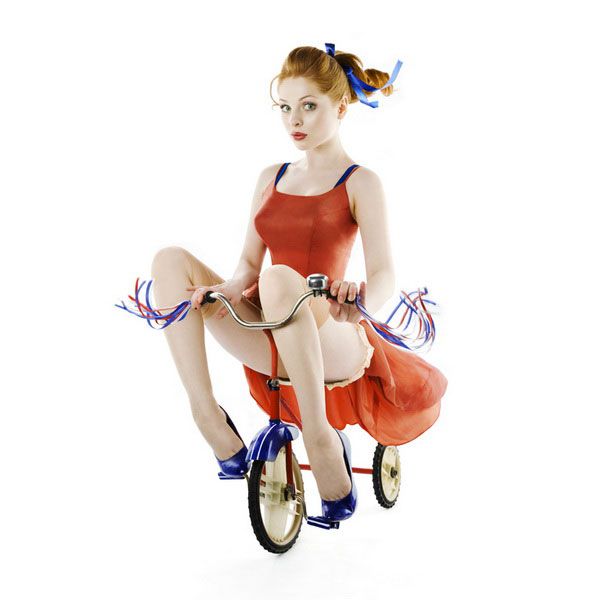
This is the image I decided to use. It’s been taken by photographer Irina Davis who creates style called Russian Pin-up.
Open the image in Corel PHOTO-PAINT. Then head over menu and select “Image > Convert to Black & White (1bit)“. From Conversion Method choose Line Art and set Threshold to about 50 (It can vary for every image, just set it to level which leaves only the darkest spots). I’m going to have 3 layers so my darkest will be 50. But you can have 20 layers and change the Threshold in very small steps starting from 10 or so.
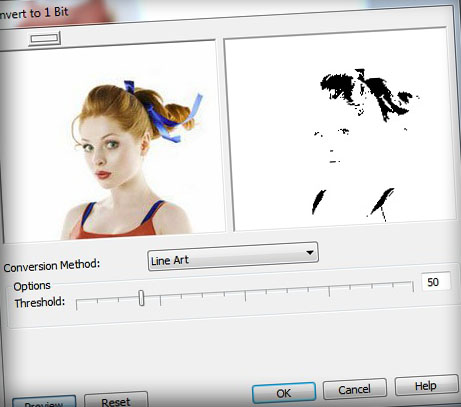 Now you can save the image in any format you want. I used the default Corel PHOTO-Paint format and saved it as “layer1.cpt“. Then “Edit > Undo B&W“. “Image > Convert to Black & White (1bit)“. Set Threshold to 65 – “ File > Save As > layer2.CPT“.
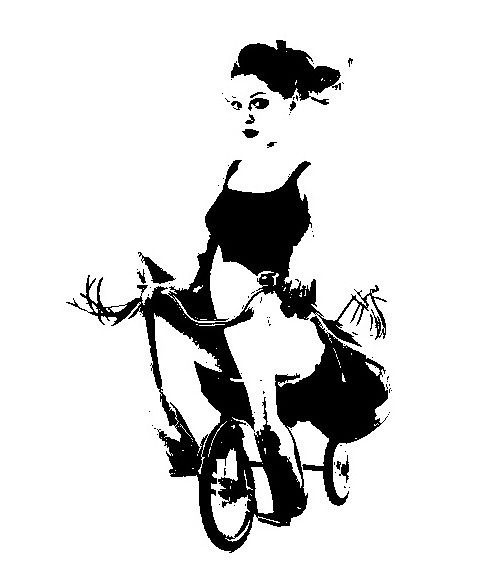
And here is how result looks like:
Repeat this step one more time (or even more times for more layers). Here I’ve set the Threshold to 145 and saved it as “layer3.cpt”. Here is the result.
As you can see, every time we covered larger areas. The stencil with the smallest areas will be darkest and with the largest areas will the lighter colors.
Don’t forget to use Eraser Tool for every layer to connect all the whites.
Plotter is going to cut out all the blacks and if there is any white closed inside the black it will fall out with blacks as well.
All I have to do now is to import these CPT files into CorelDRAW to convert them into vectors. Close Corel PHOTO-PAINT and Open CorelDRAW.
2. Add Layers into CorelDRAW X5
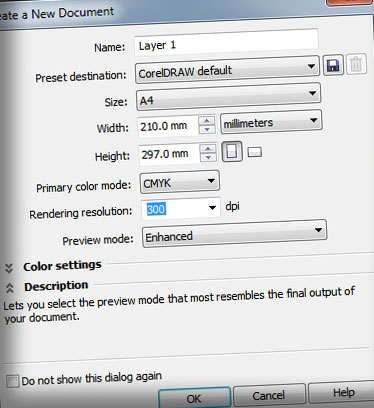
First step when you open CorelDRAW you have to head over to “File > New“. Here is the menu:
and here is our layer
Create a new layer by clicking the icon in right bottom corner and import another layerX.cpt. Repeat this until you add all your layers.
Now, when you have all your layers imported you can start conversion into vectors. For better transparency I recommend to hide the layers you are not working with for the moment (next to a layer is an eye icon, just click on it to hide the layer) so you will better see the changes.
Select the image with you mouse and click the right mouse button. Select “Outline Trace > Line Art“.
And here is the setting I’ve used:
Repeat this step for every layer. After you’ve done Outline Trace you can choose the color for that layer (it can be anything – I use different grey tones). At the same time you can bring layer up or down just by dragging/dropping it inside the Objects Manager (usually the darkest layers with the smallest areas go up, larger and lighter will be below them). Final image looks as follows:
This is it! You are ready to print your stencil. If you know of better way to make multi-layered stencil, please, let us know. If you liked this tutorial I’ll be happy if you share it on your social media (Like it, tweet it, digg it …) or at least leave a short comment.






I liked your procedure to make a stencil. I own several laser engraving machines, and I think you could use your system to do a vector cut of the stencils really easy.
Just wanted to comment. I’ll try your system on my laser and get back to you.
Marvinsherrard@yahoo.com
Thanks for your comment
I’ll be waiting for your results and I think other people will be interested too
Hi Sergej, thanks for taking your time to explain so well what I am looking for since several days. I am a beginner trying to cut my stencils with a plotter… it took me about two hours to practice your procedure but I confirm : it works !!!
BUT, sorry for that stupid question, how do we choose a color for each layer ????
Hi Nico, Thanks for approving my method. If you did it exactly according to this tutorial you should have under every layer a “Group of X Objects”.
X is a number. When you click on them you should see small squares on your image. Then you can choose the color from the vertical color table.
BTW when you click on the any color and hold the button for a second you will get even more shades of that color.
I’ve added a snap to see that better
Sergej, I am now able to do it like a pro ! thanks. But now I have another question : Is it possible to select a range of colour on a coloured picture like the one above, for example red and close, and make corel select these colours automatically (it would be the dress and lips for that example) ? I think It would much easier than using the threshold option which needs a lot of tests and avoid to select twice the same part of the picture… I hope you understand what I mean, I know my English is a little bit poor to explain such subject…
Sorry that I reply later, I was preparing another article. Your English is not that bad, I’m not native English myself. I think I got your question right. You can do something like converting bitmap picture into vectors without making any changes to threshold. Actually this could be very good to make special layers for particular colors.
Try to convert your image to vectors “outline trace”. And then when you have all vectors go to Edit>Find and Replace>Find Objects, or just use Ctrl+F. Then Begin New Search and click next, Fills > Uniform Color > Next. Specify Uniform Color Fill and choose the color you desire. than click next and finish. You should get a bar where you click “Find all”. CorelDraw will find this colors in different groups, so you will have to confirm that you want to ungroup them. After that you will see all the curves of same color selected in your right sidebar of layers. Here you can click right mouse button and group them, combine or even delete them.
You will still have the find bar up. So you can click Edit Search and select another color.
To be hones I do not know another easier way, and I do not know Corel 100%. But I’m learning every day. I hope this will be any help for you.
Great tutorial! I like that you’ve explained each step even pointing out where to go through the drop menu’s. Can’t wait to give this a go. Love this site!!!
Thanks again ;)